What to do if Brother Printer Not Printing in Black or Color?
- Mr. Ryan
- on Sep 21, 2023
Printing issues can be incredibly frustrating, especially when your Brother printer not printing in the way you want. This problem can disrupt your work and cause unnecessary stress. However, understanding the root causes and implementing the right solutions can get your printer back in action quickly. In this article, we’ll explore the common reasons behind the “Brother printer not printing black or color” issue and provide practical solutions to resolve it.
Contents
- 1 Why is My Brother Printer Not Printing Clearly?
- 2 Step-by-Step Guide to Fix Brother Printer Not Printing Black or Color
- 3 Ending Note
Why is My Brother Printer Not Printing Clearly?
Wondering why is my Brother printer not printing; there can be lots of reasons that result in this problem. These reasons include:
- Empty or Low Black Ink Cartridge.
- Air Bubbles in Ink Tubes.
- Clogged Printhead Nozzles.
- Incorrect Print Settings.
- Firmware Issues.
There are many more reasons that result in this frustrating problem.
Step-by-Step Guide to Fix Brother Printer Not Printing Black or Color
As listed above, there are lots of reasons that result in Brother printer not printing black problems. Once you know the leading cause of the problem, you can quickly implement the right solution and get your Brother printer working again effectively.
Check the Ink Level
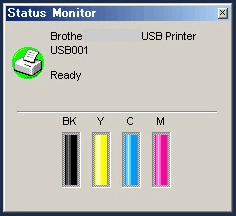
The very first step that you need to take when you have a Brother printer not printing black is to check the ink level following the below steps:
- Turn on your Brother printer
- Select the Ink option >> ink volume.
- Now, you can see “ink volume” from the options available on the screen.
Remove Protection Tap
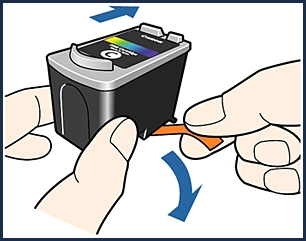
If your Brother printer not printing color even after having the right ink level, you can try this solution:
- Remove the protective tape.
- Also, remove the ink cartridge from the printer.
- After removing the protective tape, reinstall the ink cartridge in the printer.
Install a New Cartridge
You might face Brother printer not printing in color issue even due to cheap ink cartridges. Even a dried ink cartridge can stop a Brother printer from printing black text. You can follow below points to solve the problem:
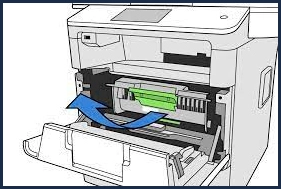
- Open the front panel.
- Lift the lock lever and unlock the black ink cartridge.
- Remove the cartridge.
- Remove the protection tap and insert the black cartridge slot.
- Lock the cartridge.
- Don’t forget to cover the front.
- Now restart the Brother printer.
Clean the Print Head
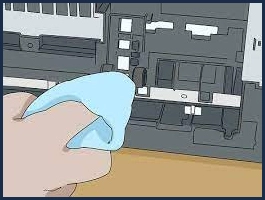
Printhead, if jammed, prevents you from printing the documents in black or other colors. In such a situation, it becomes mandatory for you to clean the Print Head following the below steps:
- Switch on your printer.
- Click on the Menu or Home button.
- Scroll and search for the ink option.
- Click on “OK”.
- Now go to cleaning and select OK.
- Choose “black color” >> “clean”.
Unclog the Nozzle
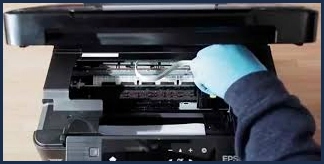
Still facing brother printer won’t print black or color issues, you must surely check if there is no chunk of ink particles on the cartridge nozzle. You can clean it by following the below steps:
- Connect your computer and Brother printer.
- Go to “control panel” >> device & printers.
- Click on Brother printer property >> printing preferences.
- Now go to maintenance.
- Select Nozzle cleaning.
- Click on start.
Restart Spooler Services
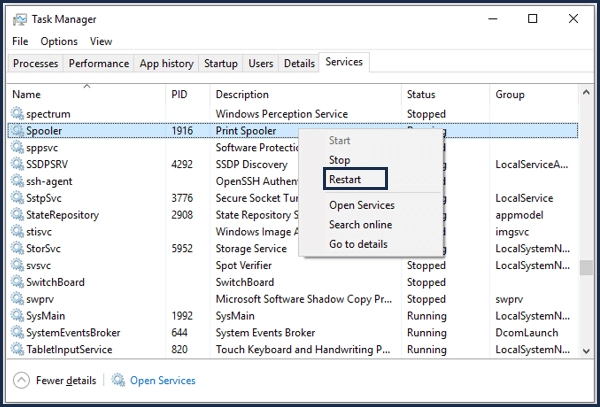
On your computer, you can restart the spooler service to ensure it’s functioning perfectly. Try the below steps to deal with the problem:
- Open the Windows service manager.
- Open the Run dialog box by hitting on Windows Key + R.
- Select print spooler service.
- Type services.msc and press Enter.
- Locate the “Print Spooler” service, right-click on it, and select Restart. This will refresh the print spooler.
Reinstall Brother Printer Driver
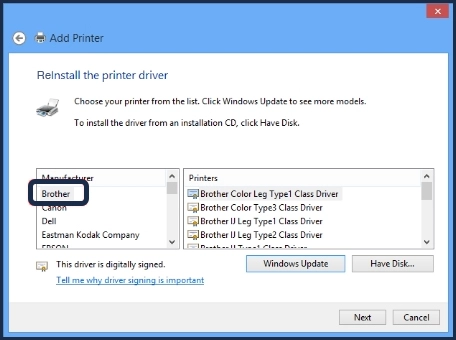
Even after following all the above solutions, if you are still facing the Brother printer not printing clearly, don’t worry. You can reinstall the Brother printer driver to make it work again. To reinstall Brother printer drivers on both Windows and Mac computers, follow these steps:
For Windows:
Uninstall Old Drivers
You are advised to uninstall the existing Brother printer driver before reinstalling it. Follow the below steps to do so:
- Go to “Control Panel”
- Search for “Programs”
- Now hit on “Uninstall a program”
- Choose the Brother printer software you are using and follow the uninstallation steps available on the screen.
Download New Drivers
Once you uninstall the driver, it’s time to reinstall it, and the Brother printer not printing in color is solved. Download and install new drivers by following the below steps:
- Go to the official website.
- Search for the updated driver version.
- Enter the model number in the search field >> enter.
- Select the OS and driver package you wish to download.
- Start downloading.
Install Updated Drivers
After downloading and installing the driver, it’s time to run the driver installer. Follow the steps displayed on the screen. Once you complete the installation, you can restart your computer.
Connect and Test the Printer
- Connect the Brother printer to your PC using a USB cable.
- You can even set it up on your network if it’s a wireless printer.
- Once after connect it to your PC, try to print a test page or perform a test print to ensure that the Brother printer is working correctly.
For Mac:
If Brother printer won’t print on Mac, you don’t have to worry. You can reinstall the printer driver and make it work again.
Uninstall Old Drivers
- Make sure to uninstall the Brother printer driver before installing a new one.
- Go to “System Preferences” > “Printers & Scanners.”
- Choose your Brother printer from the list on the left and click the “-” button to remove it.
Download Drivers
Once after uninstall the printer driver, you need to reinstall it following the below steps:
- Visit the official site.
- Enter your printer model in the search bar and press Enter.
- Check the list and choose the printer model.
- Select the OS and download the driver package.
- Start downloading.
Install Updated Drivers
- Once you complete the download of the printer driver, it’s time to run the same.
- Follow the step-by-step guide visible on the screen to complete the process.
Connect the Printer
- Connect the printer to the Mac.
- You can use a USB cable or configure the same for wireless printing.
Add the Printer to macOS
- Go to “System Preferences” > “Printers & Scanners.”
- Now select the “+” button to add a new printer.
- Ensure that the Brother printer you are using is available in the list.
- Click on “Add” if you can’t find your printer in the list.
Ready for Test
Once after completing the installation of a driver, it’s time to test to check whether the Brother printer not printing clearly is solved.
Regular Maintenance
To avoid facing any printer-related problems in the future, it’s advisable for you to perform regular maintenance. These can include:
- Cleaning the print head
- Replacing the cartridges
- Check ink level
Ending Note
If you are searching for “Why is my Brother printer not printing” and not finding an appropriate answer. This blog will surely be helpful to you. You can try solutions one by one to solve the Brother printer not printing clearly a problem. However, if you fail to do so, it’s wise to connect with a professional team who can guide you in the right manner.